Multi-platform binary releases for a Rust CLI
Posted on 2026-05-24, by Racum.
My main issue shipping personal Rust CLI projects was convincing people, especially non-developers, to install a Rust toolchain. So I built binaries for the main desktop operating systems, made them updatable via package managers, and used GitHub Actions to automate the whole process. This article walks through how I did it.
A CLI app can be distributed at several levels:
- Level 0: just source. In Rust's terms, this means running
cargo install {package}. - Level 1: binaries directly. Build all executables and make them available for download.
- Level 2: binaries via self-hosted package manager. Level 1 plus integrations with Homebrew, APT, Scoop, etc., but requires setting up a custom repository definition (the scope of this article).
- Level 3: binaries via official package manager. Like level 2, but via each manager's main channels, no custom repo needed. Use this if your app becomes popular.
Why am I stopping at level 2?
- My app isn't popular yet, and I want freedom to iterate before committing to external review.
- Homebrew: homebrew-core has notability thresholds and maintainer review on every version bump.
- APT: requires a sponsor (a Debian developer) to upload on your behalf until you earn upload rights yourself.
- Scoop: the Main bucket only accepts popular, non-GUI tools with a simple install.
There are other package managers per platform, but I'm limiting myself to the most popular ones.
Planning the builds
First, I want to target the three main desktop operating systems: Windows, macOS, and Linux, supporting versions as far back as reasonable. All three platforms run on x86 and ARM, so both need coverage. My cutoff is 64-bit; that covers almost the last 20 years of desktop computing. Anything older or weirder can fall back to the source distribution.
Notes about future support:
- As of writing, macOS 26 "Tahoe" is the last version to run natively on Intel Macs (details). A few years from now, ARM-only distributions will be widely accepted by users.
- Windows on ARM today has very little market share compared to x86, but Microsoft and hardware manufacturers are pushing for broader ARM adoption.
- Linux has no problem adopting new platforms. Keep an eye on RISC-V: Linux already supports it, so if it gains traction you can add a target later.
Linux
Here you have a choice to make: musl or glibc. I suggest starting with musl: it yields a static binary that can run everywhere, including on Alpine Linux. If you have complex dependencies or are having hard-to-debug compilation issues, fall back to glibc.
Targets:
- musl:
x86_64-unknown-linux-muslandaarch64-unknown-linux-musl. - glibc:
x86_64-unknown-linux-gnuandaarch64-unknown-linux-gnu.
If you go for musl, you should set RUSTFLAGS="-C target-feature=+crt-static".
The CI workflow later in this article uses cargo deb to build the .deb packages. It reads a [package.metadata.deb] block from Cargo.toml (example); copy it and adapt to your case.
macOS
The issue here is usability: macOS users usually do not care about their CPU architecture, and some don't even know what processor they are running. For Apple platforms, the common guidance is to ship a "Universal Binary" (other platforms call this a "fat binary"): a single file containing both Intel and ARM slices, where the system picks the right one at runtime. You need to build for both targets and combine them using the lipo tool.
Targets: x86_64-apple-darwin and aarch64-apple-darwin.
Windows
Windows also requires a choice, this time between msvc and gnu. Most sources recommend msvc (Microsoft Visual C++), since it's the native Windows toolchain with first-party Microsoft support and better ABI compatibility with other Windows software. Pick msvc unless you have a strong reason against it.
Targets:
- msvc:
x86_64-pc-windows-msvcandaarch64-pc-windows-msvc. - gnu:
x86_64-pc-windows-gnuandaarch64-pc-windows-gnullvm(Tier-2).
Nice-to-have: Windows icon and property details. Optional, but improves the polish of your app. Add the winres crate to [build-dependencies] in your Cargo.toml (example) and set the values in build.rs (example). You’ll need a properly formatted .ico file (instructions).
Setting up the package managers
I wanted a single infrastructure: not just for one CLI app, but generic enough to support more apps in the future. I'm using GitHub in this article, but the instructions are easily adaptable to other version control services.
On GitHub, create the repositories:
homebrew-tapaptscoop-bucket
All public and with no extras (README, LICENSE, .gitignore, etc.).
Homebrew (macOS)
In the homebrew-tap repository, create the formula file Formula/{app}.rb (example).
Adapt the formula example to your case, then commit and push.
APT (Linux)
This is the hardest one to set up; follow the steps carefully:
Step 1: APT requires HTTPS, not the git protocol. Enable GitHub Pages on the apt repository: Settings → Pages → Source: Deploy from branch → main.
Step 2: you need to generate a pair of GPG keys. Follow these instructions:
$ gpg --batch --gen-key <<EOF
%no-protection
Key-Type: RSA
Key-Length: 4096
Name-Real: {name}
Name-Email: {email}
Expire-Date: 0
EOF
$ gpg --list-secret-keys --keyid-format LONG {email}  # Find the 40-char Key ID in the output.
$ gpg --armor --export {email} > key.gpg
$ gpg --armor --export-secret-keys {email} > private.key
Replace {email} with your email and {name} with something that identifies your APT source. Make sure you have all these assets:
key.gpgfile: the public key, save it in the root of youraptrepository.private.keyfile: the private key, save it in a safe place (like a password manager); you'll need it later.- The 40-char key ID: noted from the second gpg command; also needed later.
Step 3: create the file scripts/update-apt-repo.sh in the apt repository, with the contents of the script I used for my app.
Step 4: create the extra directory structure needed:
mkdir -p pool/main/amd64 pool/main/arm64 dists/stable/main/binary-amd64 dists/stable/main/binary-arm64 scripts
touch pool/main/amd64/.gitkeep
touch pool/main/arm64/.gitkeep
touch dists/stable/main/binary-amd64/.gitkeep
touch dists/stable/main/binary-arm64/.gitkeep
At this point, the apt repository tree should look like this:
.
├── dists
│   └── stable
│       └── main
│           ├── binary-amd64
│           │   └── .gitkeep
│           └── binary-arm64
│               └── .gitkeep
├── key.gpg
├── pool
│   └── main
│       ├── amd64
│       │   └── .gitkeep
│       └── arm64
│           └── .gitkeep
└── scripts
    └── update-apt-repo.sh
Step 5: commit and push.
Scoop (Windows)
In the scoop-bucket repository, create the file bucket/{app}.json (example).
Adapt the bucket example to your case, then commit and push.
Automating with GitHub Actions
This is the pipeline we are about to wire up:

Action trigger
First, you need to choose a trigger. In my case, I decided that pushes on the release branch would start the GitHub Action. That is a personal preference; other valid triggers include pushes on main, pushes with a tag, etc.
Set GitHub token
On GitHub, you need to define a fine-grained personal access token ("PAT"), which will allow the app CI to make changes to the package manager repositories.
- Go to github.com → Settings → Developer settings → Personal access tokens → Fine-grained tokens → Generate new token.
- Name it app-deploy. Description: CI deploy token for app release workflows.
- Repository access → Only select repositories; pick apt, homebrew-tap, and scoop-bucket.
- Repository permissions → Contents: Read and write.
- Copy the token immediately; GitHub shows it only once.
You only need to do this once.
Review secrets
From this point on, you need to repeat the instructions per app.
In the app repository, go to Settings → Secrets and variables → Actions → Repository secrets. Set these variables:
HOMEBREW_TAP_TOKEN: the app-deploy token.SCOOP_BUCKET_TOKEN: the app-deploy token.APT_REPO_TOKEN: the app-deploy token.APT_SIGNING_KEY: the contents of the private key generated when setting up the APT repository.APT_SIGNING_KEY_ID: the 40-character key ID, also generated when setting up the APT repository.
Write the workflow
Create the file .github/workflows/release.yml in your app repository. This is where we put it all together. Use my app's workflow as a template and adapt it to your case (change app name, repositories, versions, etc.). If it feels overwhelming, an AI can help adapt it.
Two jobs in the workflow are worth calling out:
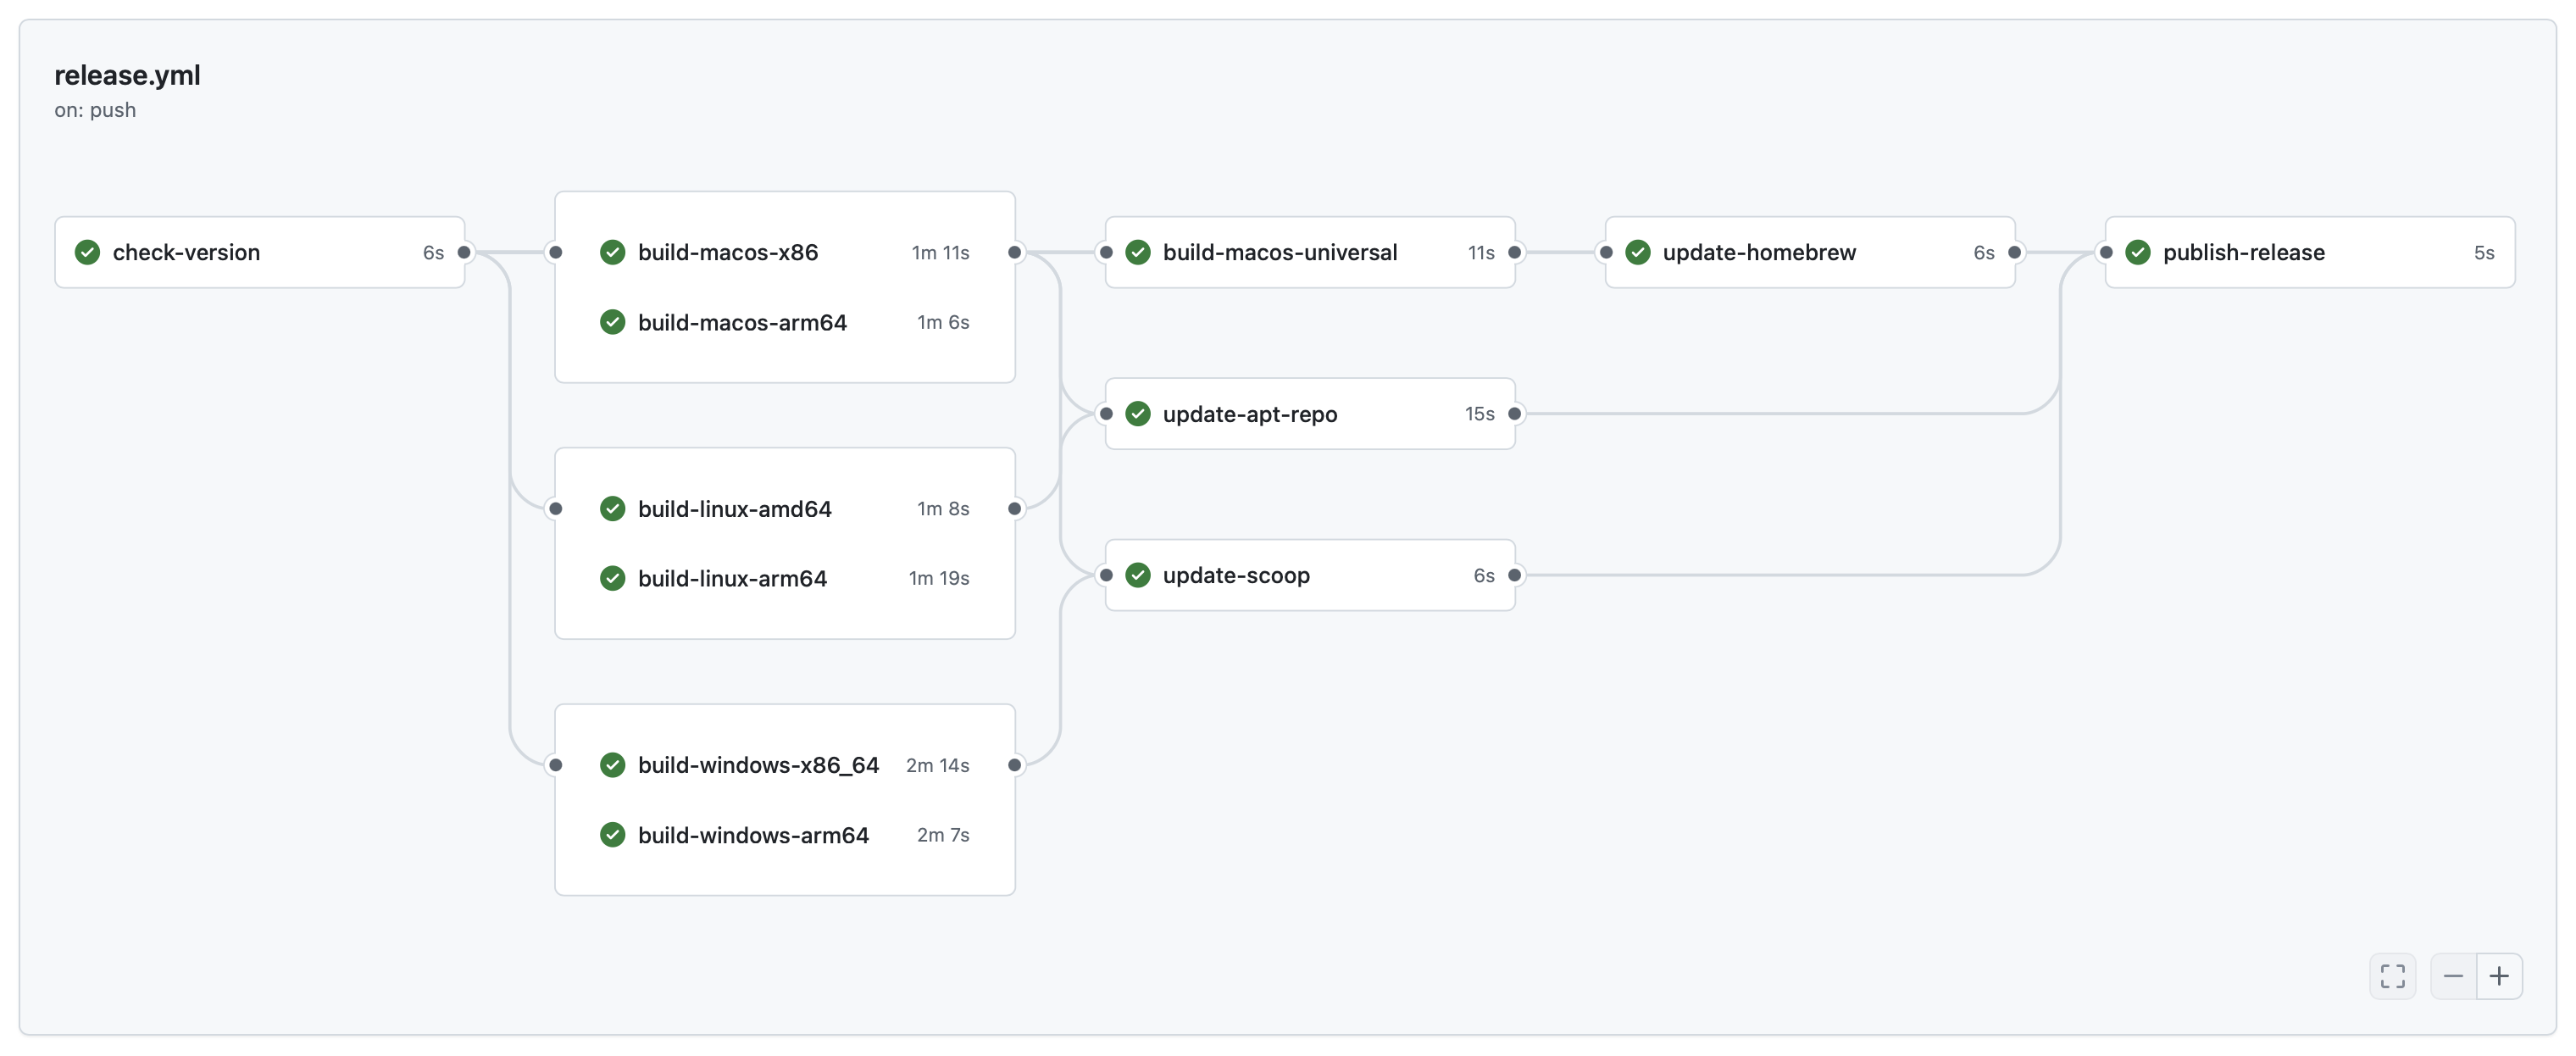
check-versionreads the version fromCargo.tomland fails the run early if that version is already published on GitHub Releases. It also creates a draft release upfront, so all subsequent build jobs upload assets into the same draft.publish-releaseruns last, after every package manager update succeeds. It promotes the draft to published, so users never see a half-finished release if any earlier step fails.
Test it
Bump the version of your app, commit, merge to the release branch (or whatever trigger you picked), and push. You should see a CI tree like this:
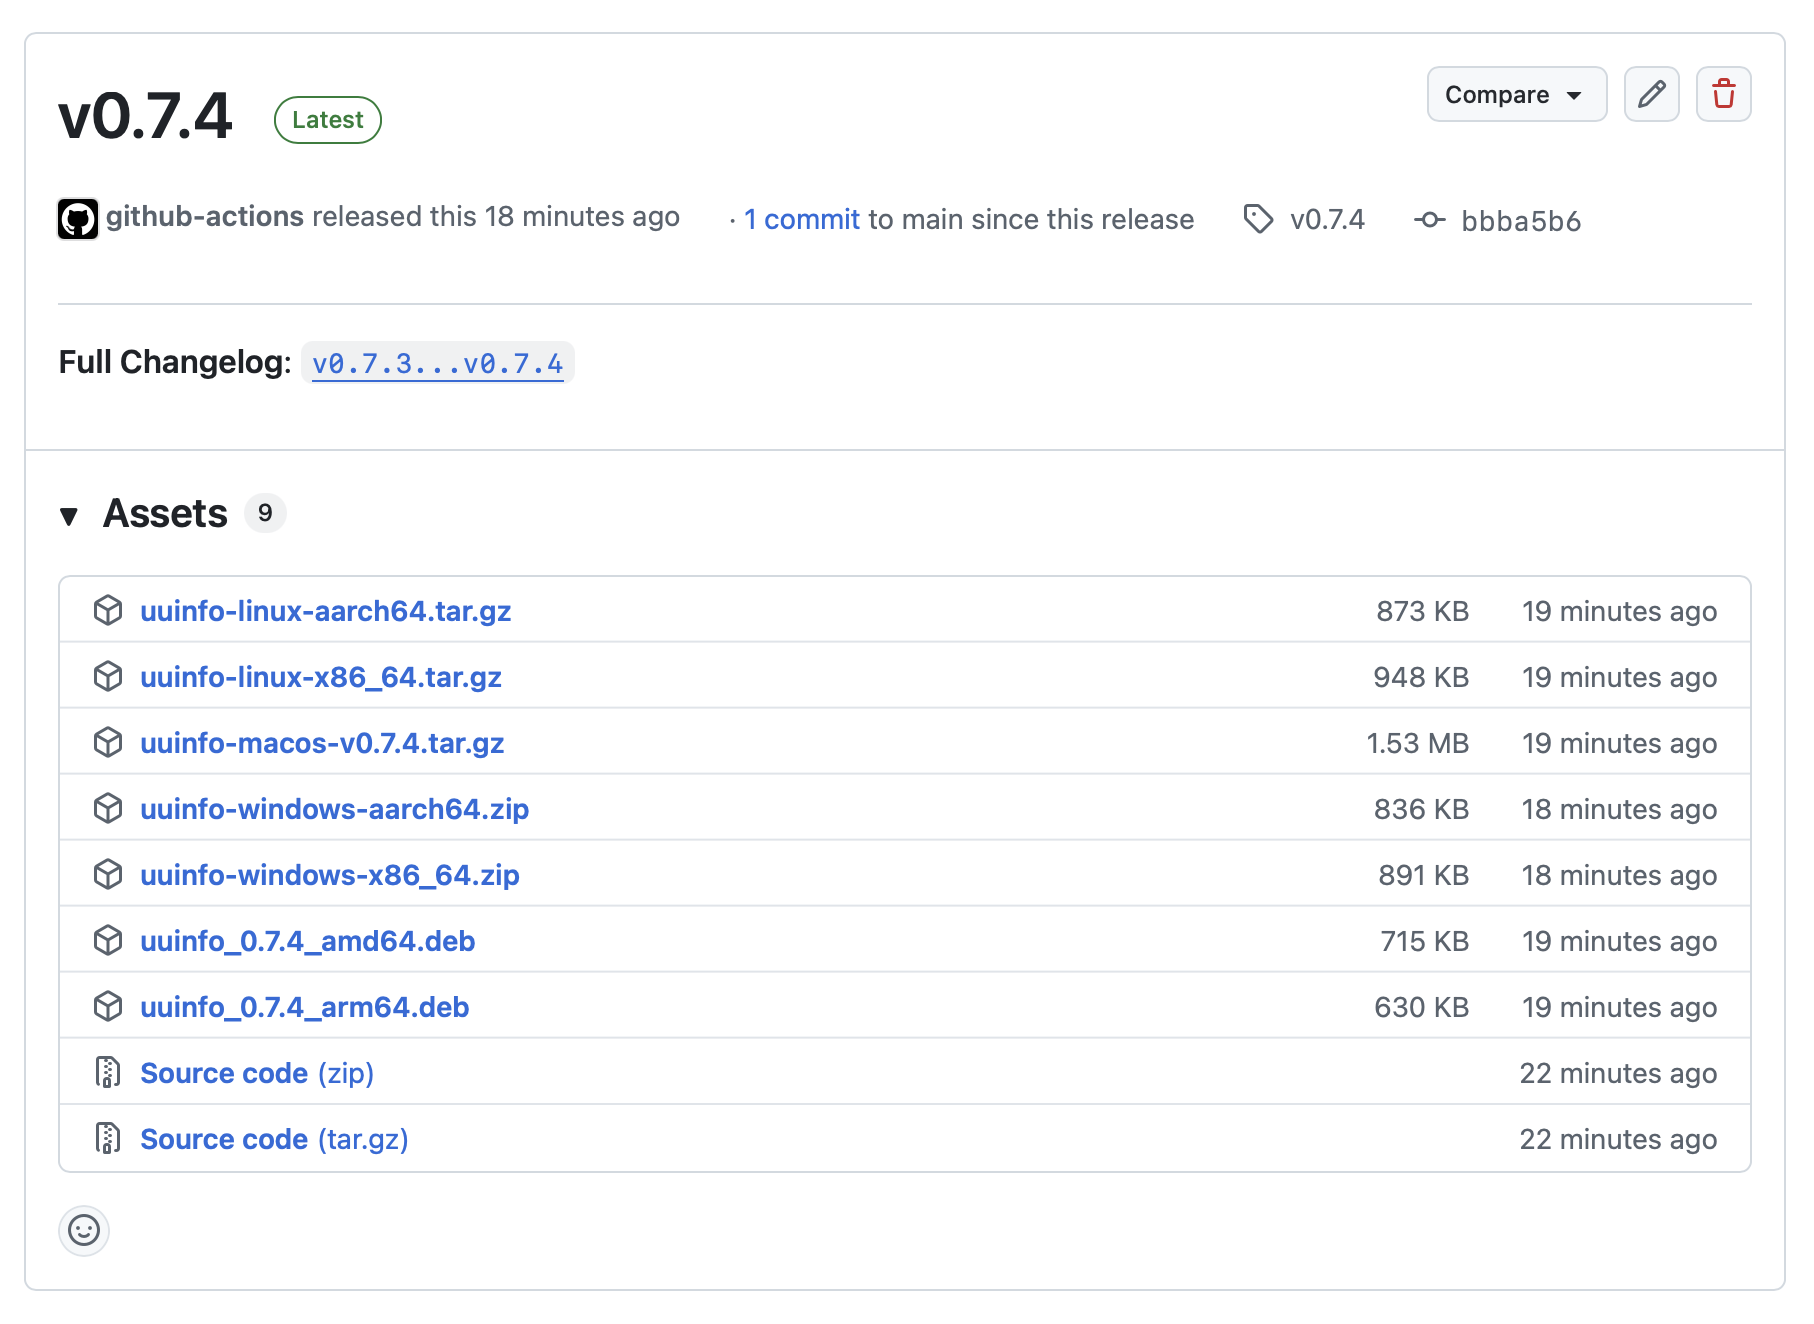
The repository Releases page should show something like this:
Instructing your users
Via package managers
macOS (Homebrew):
$ brew tap {github-user}/tap
$ brew install {app}
Linux (Debian/Ubuntu):
$ curl -fsSL https://{github-user}.github.io/apt/key.gpg \
  | sudo gpg --dearmor -o /etc/apt/keyrings/{github-user}.gpg

$ echo "deb [signed-by=/etc/apt/keyrings/{github-user}.gpg] \
  https://{github-user}.github.io/apt stable main" \
  | sudo tee /etc/apt/sources.list.d/{github-user}.list

$ sudo apt update && sudo apt install {app}
Windows (Scoop):
> scoop bucket add {github-user} https://github.com/{github-user}/scoop-bucket
> scoop install {app}
Direct download
You can also point users to the binaries directly. Assets on GitHub Releases always follow this pattern for the latest release:
https://github.com/{github-user}/{app}/releases/latest/download/{file}
Conclusion
I hope this article was useful. Distributing a Rust CLI may feel like a project of its own, but with the right combination of GitHub Actions and a few small repositories, it becomes a reusable infrastructure that scales to every future app you build. Now you can focus on writing the code and let CI handle the boring part, maybe even going for the official channels. If you do, show me what you build (contacts on my about page).